When I’m at my desk during the week and have written new code, I always create a new unit test file, and it looks something like this:
I asked myself two questions:
Why do I create a new testcase class for every new class?
Why do all of the tests I have always contains four-steps?
History of XCTest and xUnit
XCTest is based off of OCUnit and falls under the family of xUnit testing frameworks. xUnit is the collective name for several unit testing frameworks that derive their structure and functionality from Smalltalk’s SUnit [1], notably JUnit, which was also authored by Kent Beck [2]. In March 1998, OCUnit was written by Sen:te using Kent Beck’s description of the Smalltalk testing framework [3]. Understanding the origins of XCTest and JUnit helped me discover that most of the testing habits I have today all derive from Kent Beck’s Simple Smalltalk Testing: With Patterns.
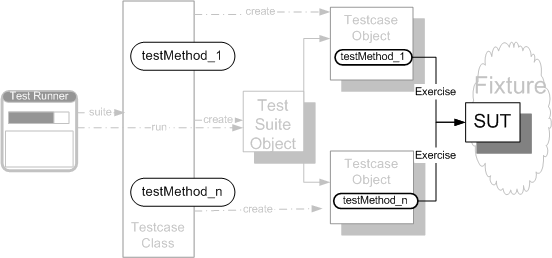
One Testcase Class
I recommend that developers write their own unit tests, one per class. The framework supports the writing of suites of tests, which can be attached to a class. I recommend that all classes respond to the message “testSuite”, returning a suite containing the unit tests.
It was Kent Beck’s philosophy that led to the practice of creating one testcase class per class. Beck believed that test logic should be encoded as a single test method on some class [4], and a testcase class gives you a place to group these similarly related test methods [5]. Making test methods instance methods of a testcase class and creating a testcase object for each test, allows us to manipulate the test methods at runtime, such as running a single test case, a group of test cases, or skipping a particular test case [6].
Source: xUnitPatterns
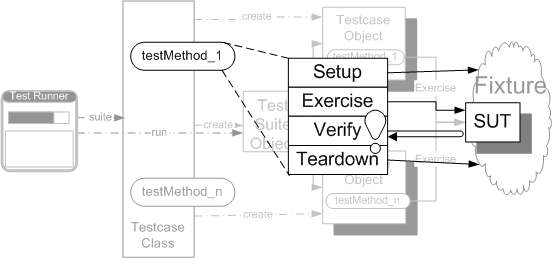
Four-Phase Test
Source: xUnitPatterns
The idea of having a setup method, a test method, then a tearDown method come from Beck’s work, and has been formalized into what is called the Four-Phase Test. In the Four-Phase Test, every test has four distinct phases that are executed in sequence: setup, exercise SUT (system under test), result verification, and fixture teardown [6]. The purpose of creating clear distinctions in the phases was to make the system under test extremely obvious.
The inspiration for the design was based around the fact that automated tests should serve at least two purposes:
First, they should act as documentation of how the system under test (SUT) should behave; we call this Tests as Documentation. Second, they should be a self-verifying executable specification.
— Gerard Meszaros, xUnitPatterns
The Four-Phase Test can be thought of as a state machine. In the fixture setup phase, the test establishes the prior state of the world. In the second phase we interact with the SUT, which transitions us to the next state. In the third phase we analyze the post state of the world and verify that it meets our expectations. Then in the fourth phase, we reset the state of the world prior to running the test.
Conclusion
Unit testing may sometimes become a laborious process, so it’s refreshing to take a step back and understand why we do the things that we do. The inspiration of unit testing frameworks in iOS or OS X has been around since the first version of SUnit in 1994 [7], and given that unit testing hasn’t changed much since then, it seems that the paradigms of one testcase class per class and four-phase testing are here to stay.
Download Dulu Aplikasi Go Launcher Sama Tema Nya Instal Ke Dua Aplikasi ( Tema Dan Go Launcer ) Kembali Ke Home Screen HP Tekan Menu Pilihan > Pilih Menu Theme > Pilih Tema Yang Sudah Di Instal Tadi
GO Launcher 5 has arrived! Its UI and UX has been recreated from bottom to top. Enjoy simple and intelligent new mobile experience, or start customizing the looking and feel in your own way.GO Launcher EX - the final choice for 200,000,000+ people! User voted best Android Launcher! Download it now to enjoy 10,000+ themes and experience the super speedy and smooth operation provided by powerful 3D core! As the best home screen replacement, it offers you many first-ever features to customize your own homescreen experience. It is not only for people who taking Android for granted, but for those who take their Android for lifestyle and partner in life. Pro Features : - Multi-touch to quick access to core functions - 4 additional splendid transition effects - No sponsored messages or Ads
What would you do to survive in an apocalyptic world where your school friends got turned into zombies (monsters)? How far can you go to save your loved ones?
If you think you can handle zombies armies in normal story mode, try the additional badass Survival Mode and see how good your monster fighting skills really are.
The sky citadel of Meredith on Planet Eona has repelled attack after attack for centuries. It was long thought to be the most secure of all the Union’s great cities. But now, its survival hangs in the balance.
The gathering storm has finally broken over the city and unleashed the forces of evil. The Scythes, destroyers of so many worlds, have arrived! Can you save Meredith and defeat this army of darkness once and for all?
Game MODDED : - Cube Start with 99999999 - Stars Start with 9999888
Samsung Galaxy Note 10.1 (GT-N8000) users who wish to root and install ClockworkMod Recovery (CWM) on their devices, may follow our step-by-step guide below.
This tutorial uses PhilZ Touch recovery was developed and released by Recognized XDA-Developers, Phil3759. PhilZ Touch is a CWM Advanced Edition that adds all the features you could ever miss in CWM. Head over to the PhilZ Touch main thread to learn more about the features. Disclaimer: Rooting voids the warranty of your device. We and the developer of this rooting procedures shall not be held responsible if any undesirable outcomes may happen to your device. use of this root guide is solely at your own risk!
Pre-Requisites 1. Install USB Drivers for Samsung Galaxy Note 10.1 on your computer. 2. Enable USB Debugging Mode on the note by navigating to Settings >> Developer Options. 3. Make a backup of all your important data before following the guide. 4. Ensure the battery of the note is charged more than 80 percent. 5. The CWM recovery works only on the Galaxy Note 10.1 (GT-N8000). Applying these on any incorrect variant might brick the device. Verify the model number of the Galaxy Note 10.1 by selecting Settings >> About Phone.
Steps to Install CWM Recovery on Galaxy Note 10.1 N8000 Step 1: Extract the Odin 3.09 .zip files using WinRAR/7-Zip/WinZip or any other extracting tool. Step 2: Copy the SuperSU .zip file to the SD card of your device. Step 3: Switch off the Galaxy Note 10.1. Then boot into Download Mode by pressing and holding Volume Downand Power buttons together until a construction Android robot icon with a warning triangle appears on screen. Now press the Volume Up button to enter Download Mode. Step 4: Run Odin on the computer as an Administrator. Step 5: Connect the Galaxy Note 10.1 to the computer using USB cable while it is in the Download Mode. Wait until Odin detects the device. When the device is connected successfully, the ID: COM box will turn to light blue with the COM port number. Additionally, the successful connected will be indicated by a message saying Added. Step 6: In Odin, click the AP button and select the philz_touch_6.41.6-n8000.tar.md5 file. Make sure that the Re-Partition checkbox is NOT ticked. Step 7: Double-check and click Start button in Odin. The installation process will now begin. Step 8: Once the installation process completes, your note will restart and soon you will see a PASS message with green background in the left-most box at the very top of the Odin. You can now unplug the USB cable to disconnect it from the computer.
Steps to Root Galaxy Note 10.1 N8000 via CWM Recovery Step 9: Boot the Galaxy Note 10.1 into CWM Recovery by pressing and holding Volume Upand Power buttons together. Step 10: In CWM Recovery, select "Install zip from sdcard" option then navigate to the SuperSU .zip file that you copied earlier and confirm the installation. Step 11: Once the installation process completes, return to main recovery menu and select "Reboot System Now".
Samsung Galaxy Note 10.1 N8000 running on Android 4.4.2 KitKat is now rooted successfully. You can now install any app that requires root permission. Verify the root status of the device by downloading Root Checker app from Google Play Store.
Note:Many Samsung devices store a flash counter that keeps track of how many times you have flashed custom firmwares to your device. Triangle Away can be used to reset the flash counter to zero.
Thank's to all fellas at XDA who first tried out this rooting technique. This method was originally posted via XDA-Developers original thread.
Samsung Galaxy Note 10.1 with model number GT-N8000 has received the latest Android 4.4.2 KitKat update with firmware build number N8000XXUDNE6. The new official update is now available as an Over-The-Air (OTA) update as well as through Samsung KIES. Firmware details PDA: N8000XXUDNE6 CSC: N8000ODDDNE4 MODEM: N8000DDUCNE2 Version: Android 4.4.2 Build date: May 31, 2014 Regions: India, Bangladesh, Nepal, Sri Lanka
Samsung Galaxy Note 10.1 N8000 users who missed the OTA update notification or unable to access the update over Samsung KIES, may follow our step-by-step guide to install the update manually. Pre-requisites 1. Install USB Drivers for Samsung Galaxy Note 10.1 on the computer. 2. Enable USB Debugging Mode on the note by navigating to Settings >> Developer Options. 3. Make a backup of all your important data before following the guide. 4. Ensure the battery of the note is charged more than 80 percent. 5. The Android 4.4.2 XXUDNE6 KitKat firmware is compatible only with the 3G + Wi-Fi version of Samsung Galaxy Note 10.1 (GT-N8000). Applying this to any incorrect variant might brick the device. Verify the model number of the Galaxy Note 10.1 by navigating to Settings >> About Phone.
Files Required 1. Android 4.4.2 XXUDNE6 KitKat Firmware (Mirror Link) for Galaxy Note 10.1 N8000 2. Odin 3.07 Steps to Update Galaxy Note 10.1 N8000 with Android 4.4.2 XXUDNE6 KitKat Firmware Step 1: Extract Firmware zip file using WinRAR/7-Zip/WinZip or any other extracting tool, you will get a .tar.md5 file and some other files (optional). Step 2: Extract Odin zip file and you will get Odin3 v3.07.exe along with few other files. Step 3: Switch off the Galaxy Note 10.1. Step 4: Boot the device into Download Mode by pressing and holding Volume Down and Power buttons together until a construction Android robot icon with a warning triangle appears on screen. Now press the Volume Up button to enter Download Mode. Step 5: Run Odin on the computer as an Administrator. Step 6: Connect the Galaxy Note 10.1 to the computer using USB cable while it is in the Download Mode. Wait until Odin detects the device. When the device is connected successfully, the ID: COM box will turn to light blue with the COM port number. Additionally, the successful connected will be indicated by a message saying Added. Step 7: Select the following files in Odin from extracted N8000XXUDNE6 firmware folder:
Click the PDA button and select the .tar.md5 file.
Click the Phone button and select file with MODEM in its name. Ignore if there is no such file.
Click the CSC button and select file with CSC in its name. Ignore if there is no such file.
Click the PIT button and select the .pit file. Ignore if there is no such file.
Step 8: In Odin, enable Auto Reboot and F. Reset Time checkboxes. Also, ensure the Re-Partition checkbox is chosen only if a .pit file was chosen in the previous step. Step 9: Verify everything suggested in Step 7 and Step 8 is done correctly. Then hit the Start button to begin the installation process. Step 10: Once the installation process is completed, your note will restart and soon you will see a PASS message with green background in the left-most box at the very top of the Odin. You can now unplug the USB cable to disconnect it from the computer.
Samsung Galaxy Note 10.1 N8000 should be now updated with Android 4.4.2 XXUDNE6 KitKat official firmware. Head over to Settings >> About Phone to verify the software version running on the device.
Note:If Galaxy Note 10.1 N8000 stuck at booting animation after Step 10 then go to recovery mode (press and hold the Volume Up and Power buttons together) and perform Wipe data/Factory Reset and Wipe Cache Partition task before selecting reboot system now function. In recovery mode use Volume keys to navigate between options and Power key to select the option. Please note, performing wiping task will erase your device internal memory data and not external SD card data.
Samsung has recently released a new Android 4.4.2 KitKat update for the international 3G + Wi-Fi version of Galaxy Note 8.0 with model number GT-N5100. The new official update is now available as an Over-The-Air (OTA) update as well as through Samsung KIES. Firmware details PDA: N5100XWDNE2 CSC: N5100OJVDNE2 MODEM: N5100XXDND8 Version: Android 4.4.2 Build date: May 09, 2014 Regions: United Arab Emirates, Afghanistan, Algeria, Egypt, Iran, Iraq, Kenya, Libya, Morocco, Nigeria, Pakistan, Saudi Arabia, South Africa, Tunisia
Samsung Galaxy Note 8.0 N5100 users who missed the OTA update notification or unable to access the update over Samsung KIES, can now download and install the same manually, using our step-by-step guide below. Pre-requisites 1. Install USB Drivers for Samsung Galaxy Note 8.0 on the computer. 2. Enable USB Debugging Mode on the phone by navigating to Settings >> Developer Options. 3. Make a backup of all your important data before following the guide. 4. Ensure the battery of the phone is charged more than 80 percent. 5. The Android 4.4.2 XWDNE2 KitKat firmware is compatible only with the international 3G + Wi-Fi version of Galaxy Note 8.0 (GT-N5100). Applying this to any incorrect variant might brick the device. Verify the model number of the Galaxy Note 8.0 by navigating to Settings >> About Phone.
Files Required 1. Android 4.4.2 XWDNE2 KitKat Firmware (Mirror Link) for Galaxy Note 8.0 N5100 2. Odin 3.07 Steps to Update Galaxy Note 8.0 N5100 with Android 4.4.2 XWDNE2 KitKat Firmware Step 1: Extract Firmware zip file using WinRAR/7-Zip/WinZip or any other extracting tool, you will get a .tar.md5 file and some other files (optional). Step 2: Extract Odin zip file and you will get Odin3 v3.07.exe along with few other files. Step 3: Switch off the Galaxy Note 8.0. Step 4: Boot the device into Download Mode by pressing and holding Volume Down, Home and Power buttons together until a construction Android robot icon with a warning triangle appears on screen. Now press the Volume Up button to enter Download Mode. Step 5: Run Odin on the computer as an Administrator. Step 6: Connect the Galaxy Note 8.0 to the computer using USB cable while it is in the Download Mode. Wait until Odin detects the device. When the device is connected successfully, the ID: COM box will turn to light blue with the COM port number. Additionally, the successful connected will be indicated by a message saying Added. Step 7: Select the following files in Odin from extracted N5100XWDNE2 firmware folder:
Click the PDA button and select the .tar.md5 file.
Click the Phone button and select file with MODEM in its name. Ignore if there is no such file.
Click the CSC button and select file with CSC in its name. Ignore if there is no such file.
Click the PIT button and select the .pit file. Ignore if there is no such file.
Step 8: In Odin, enable Auto Reboot and F. Reset Time checkboxes. Also, ensure the Re-Partition checkbox is chosen only if a .pit file was chosen in the previous step. Step 9: Verify everything suggested in Step 7 and Step 8 is done correctly. Then hit the Start button to begin the installation process. Step 10: Once the installation process is completes, your phone will restart and soon you will see a PASS message with green background in the left-most box at the very top of the Odin. You can now unplug the USB cable to disconnect your device from the computer.
Samsung Galaxy Note 8.0 N5100 should be now updated with Android 4.4.2 XWDNE2 KitKat official firmware. Head over to Settings >> About Phone to verify the software version running on the device.
Note:If Galaxy Note 8.0 N5100 stuck at booting animation after Step 10 then go to recovery mode (press and hold the Volume Up, Home and Power buttons together) and perform Wipe data/Factory Reset and Wipe Cache Partition task before selecting reboot system now function. In recovery mode use Volume keys to navigate between options and Power key to select the option. Please note, performing wiping task will erase your device internal memory data and not external SD card data.
Samsung has just started rolling out its first Android 4.4.2 KitKat update with firmware build number I9295XXUCNE4 for the Galaxy S4 Active with model number GT-I9295. The new official firmware is now available as an Over-The-Air (OTA) update as well as through Samsung KIES.
Firmware details PDA: I9295XXUCNE4 CSC: I9295NEECNE4 MODEM: I9295XXUCNE4 Version: Android 4.4.2 Build date: May 21, 2014 Regions: Nordic countries
Samsung Galaxy S4 Active I9295 users who missed the OTA update notification or unable to access the update over Samsung KIES, can now download and install the same manually using our step-by-step guide below. Pre-requisites 1. Install USB Drivers for Samsung Galaxy S4 Active on the computer. 2. Enable USB Debugging Mode on the phone by navigating to Settings >> Developer Options. 3. Make a backup of all your important data before following the guide. 4. Ensure the battery of the phone is charged more than 80 percent. 5. The Android 4.4.2 XXUCNE4 KitKat firmware is compatible only with the Galaxy S4 Active (GT-I9295). Applying this to any incorrect variant might brick the device. Verify the model number of the Galaxy S4 Active by navigating to Settings >> About Phone.
Files Required 1. Android 4.4.2 XXUCNE4 KitKat Firmware (Mirror Link) for Galaxy S4 Active I9295 2. Odin 3.07 Steps to Update Galaxy S4 Active I9295 with Android 4.4.2 XXUCNE4 KitKat Firmware Step 1: Extract Firmware zip file using WinRAR/7-Zip/WinZip or any other extracting tool, you will get a .tar.md5 file and some other files (optional). Step 2: Extract Odin zip file and you will get Odin3 v3.07.exe along with few other files. Step 3: Switch off the Galaxy S4 Active. Step 4: Boot the device into Download Mode by pressing and holding Volume Down, Home and Power buttons together until a construction Android robot icon with a warning triangle appears on screen. Now press the Volume Up button to enter Download Mode. Step 5: Run Odin on the computer as an Administrator. Step 6: Connect the Galaxy S4 Active to the computer using USB cable while it is in the Download Mode. Wait until Odin detects the device. When the device is connected successfully, the ID: COM box will turn to light blue with the COM port number. Additionally, the successful connected will be indicated by a message saying Added. Step 7: Select the following files in Odin from extracted I9295XXUCNE4 firmware folder:
Click the PDA button and select the .tar.md5 file.
Click the Phone button and select file with MODEM in its name. Ignore if there is no such file.
Click the CSC button and select file with CSC in its name. Ignore if there is no such file.
Click the PIT button and select the .pit file. Ignore if there is no such file.
Step 8: In Odin, enable Auto Reboot and F. Reset Time checkboxes. Also, ensure the Re-Partition checkbox is chosen only if a .pit file was chosen in the previous step. Step 9: Verify everything suggested in Step 7 and Step 8 is done correctly. Then hit the Start button to begin the installation process. Step 10: Once the installation process completes, your phone will restart and soon you will see a PASS message with green background in the left-most box at the very top of the Odin. You can now unplug the USB cable to disconnect your device from the computer.
Samsung Galaxy S4 Active I9295 should be now updated with Android 4.4.2 XXUCNE4 KitKat official firmware. Head over to Settings >> About Phone to verify the software version running on the device.
Note:If Galaxy S4 Active I9295 stuck at booting animation after Step 10 then go to recovery mode (press and hold the Volume Up, Home and Power buttons together) and perform Wipe data/Factory Reset and Wipe Cache Partition task before selecting reboot system now function. In recovery mode use Volume keys to navigate between options and Power key to select the option. Please note, performing wiping task will erase your device internal memory data and not external SD card data.
Samsung has started rolling out a new Android 4.4.2 KitKat update for the Galaxy Note 10.1 with model number GT-N8000. The new official update is currently available in Germany as an Over-The-Air (OTA) update as well as through Samsung KIES. Firmware details PDA: N8000XXUDNE4 CSC: N8000OXADNE4 MODEM: N8000XXUDNE1 Version: Android 4.4.2 Build date: May 18, 2014 Regions: Germany
Samsung Galaxy Note 10.1 N8000 users who missed the OTA update notification or unable to access the update over Samsung KIES, may follow our step-by-step guide to install the update manually. Pre-requisites 1. Install USB Drivers for Samsung Galaxy Note 10.1 on the computer. 2. Enable USB Debugging Mode on the note by navigating to Settings >> Developer Options. 3. Make a backup of all your important data before following the guide. 4. Ensure the battery of the note is charged more than 80 percent. 5. The Android 4.4.2 XXUDNE4 KitKat firmware is compatible only with the 3G + Wi-Fi version of Samsung Galaxy Note 10.1 (GT-N8000). Applying this to any incorrect variant might brick the device. Verify the model number of the Galaxy Note 10.1 by navigating to Settings >> About Phone.
Files Required 1. Android 4.4.2 XXUDNE4 KitKat Firmware (Mirror Link) for Galaxy Note 10.1 N8000 2. Odin 3.07 Steps to Update Galaxy Note 10.1 N8000 with Android 4.4.2 XXUDNE4 KitKat Firmware Step 1: Extract Firmware zip file using WinRAR/7-Zip/WinZip or any other extracting tool, you will get a .tar.md5 file and some other files (optional). Step 2: Extract Odin zip file and you will get Odin3 v3.07.exe along with few other files. Step 3: Switch off the Galaxy Note 10.1. Step 4: Boot the device into Download Mode by pressing and holding Volume Down and Power buttons together until a construction Android robot icon with a warning triangle appears on screen. Now press the Volume Up button to enter Download Mode. Step 5: Run Odin on the computer as an Administrator. Step 6: Connect the Galaxy Note 10.1 to the computer using USB cable while it is in the Download Mode. Wait until Odin detects the device. When the device is connected successfully, the ID: COM box will turn to light blue with the COM port number. Additionally, the successful connected will be indicated by a message saying Added. Step 7: Select the following files in Odin from extracted N8000XXUDNE4 firmware folder:
Click the PDA button and select the .tar.md5 file.
Click the Phone button and select file with MODEM in its name. Ignore if there is no such file.
Click the CSC button and select file with CSC in its name. Ignore if there is no such file.
Click the PIT button and select the .pit file. Ignore if there is no such file.
Step 8: In Odin, enable Auto Reboot and F. Reset Time checkboxes. Also, ensure the Re-Partition checkbox is chosen only if a .pit file was chosen in the previous step. Step 9: Verify everything suggested in Step 7 and Step 8 is done correctly. Then hit the Start button to begin the installation process. Step 10: Once the installation process is completed, your note will restart and soon you will see a PASS message with green background in the left-most box at the very top of the Odin. You can now unplug the USB cable to disconnect it from the computer.
Samsung Galaxy Note 10.1 N8000 should be now updated with Android 4.4.2 XXUDNE4 KitKat official firmware. Head over to Settings >> About Phone to verify the software version running on the device.
Note:If Galaxy Note 10.1 N8000 stuck at booting animation after Step 10 then go to recovery mode (press and hold the Volume Up and Power buttons together) and perform Wipe data/Factory Reset and Wipe Cache Partition task before selecting reboot system now function. In recovery mode use Volume keys to navigate between options and Power key to select the option. Please note, performing wiping task will erase your device internal memory data and not external SD card data.
Samsung Galaxy Mega 6.3 with model number GT-I9200 has started receiving Android 4.4.2 KitKat update with firmware build number I9200XXUDNE4. The new official firmware is currently available as an Over-The-Air (OTA) update as well as through Samsung KIES. Firmware details PDA: I9200XXUDNE4 CSC: I9200SERDNE4 MODEM: I9200XXUDNE4 Version: Android 4.4.2 Build date: May 21, 2014 Regions: Russia
Samsung Galaxy Mega 6.3 I9200 users who missed the OTA update notification or unable to access the update over Samsung KIES, can now download and install the same manually using our step-by-step guide. Pre-requisites 1. Install USB Drivers for Samsung Galaxy Mega 6.3 on the computer. 2. Enable USB Debugging Mode on the phone by navigating to Settings >> Developer Options. 3. Make a backup of all your important data before following the guide. 4. Ensure the battery of the phone is charged more than 80 percent. 5. The Android 4.4.2 XXUDNE4 KitKat firmware is compatible only with the 3G version of Samsung Galaxy Mega 6.3 (GT-I9200). Applying this to any incorrect variant might brick the device. Verify the model number of the Galaxy Mega 6.3 by navigating to Settings >> About Phone.
Files Required 1. Android 4.4.2 XXUDNE4 KitKat Firmware (Mirror Link) for Galaxy Mega 6.3 I9200 2. Odin 3.07 Steps to Update Galaxy Mega 6.3 I9200 with Android 4.4.2 XXUDNE4 KitKat Firmware Step 1: Extract Firmware zip file using WinRAR/7-Zip/WinZip or any other extracting tool, you will get a .tar.md5 file and some other files (optional). Step 2: Extract Odin zip file and you will get Odin3 v3.07.exe along with few other files. Step 3: Switch off the Galaxy Mega 6.3. Step 4: Boot the device into Download Mode by pressing and holding Volume Down, Home and Power buttons together until a construction Android robot icon with a warning triangle appears on screen. Now press the Volume Up button to enter Download Mode. Step 5: Run Odin on the computer as an Administrator. Step 6: Connect the Galaxy Mega 6.3 to the computer using USB cable while it is in the Download Mode. Wait until Odin detects the device. When the device is connected successfully, the ID: COM box will turn to light blue with the COM port number. Additionally, the successful connected will be indicated by a message saying Added. Step 7: Select the following files in Odin from extracted I9200XXUDNE4 firmware folder:
Click the PDA button and select the .tar.md5 file.
Click the Phone button and select file with MODEM in its name. Ignore if there is no such file.
Click the CSC button and select file with CSC in its name. Ignore if there is no such file.
Click the PIT button and select the .pit file. Ignore if there is no such file.
Step 8: In Odin, enable Auto Reboot and F. Reset Time checkboxes. Also, ensure the Re-Partition checkbox is chosen only if a .pit file was chosen in the previous step. Step 9: Verify everything suggested in Step 7 and Step 8 is done correctly. Then hit the Start button to begin the installation process. Step 10: Once the installation process completes, your phone will restart and soon you will see a PASS message with green background in the left-most box at the very top of the Odin. You can now unplug the USB cable to disconnect your device from the computer.
Samsung Galaxy Mega 6.3 I9200 should be now updated with Android 4.4.2 XXUDNE4 KitKat official firmware. Head over to Settings >> About Phone to verify the software version running on the device.
Note:If Galaxy Mega 6.3 I9200 stuck at booting animation after Step 10 then go to recovery mode (press and hold the Volume Up, Home and Power buttons together) and perform Wipe data/Factory Reset and Wipe Cache Partition task before selecting reboot system now function. In recovery mode use Volume keys to navigate between options and Power key to select the option. Please note, performing wiping task will erase your device internal memory data and not external SD card data. Read also:How to Root Galaxy Mega 6.3 I9200/I9205 on Android 4.2.2 Jelly Bean Firmware
Samsung has recently released a new Android 4.4.2 KitKat update with firmware build number N5110XXDNE1 for the Wi-Fi version of Galaxy Note 8.0 with model number GT-N5110.
Samsung Galaxy Note 8.0 (Wi-Fi) N5110 users who have already updated their devices with Android 4.4.2 KitKat, may root their devices using the tutorial below.
This tutorial uses CF-Auto-Root file released by Senior Recognized XDA-Developers, Chainfire. Head over to the CF-Auto-Root main thread to learn more about the root method. Disclaimer: Rooting voids the warranty of your device. We and the developer of this rooting procedures shall not be held responsible if any undesirable outcomes may happen to your device. use of this root guide is solely at your own risk!
Pre-requisites 1. Install USB Drivers for Samsung Galaxy Note 8.0 on the computer. 2. Enable USB Debugging Mode on the phone by navigating to Settings >> Developer Options. 3. Make a backup of all your important data before following the guide. 4. Ensure the battery of the phone is charged more than 80 per cent. 5. The CF-Auto-Root file works only on the Wi-Fi version of Samsung Galaxy Note 8.0 (GT-N5110). Applying this to any incorrect variant might brick the device. Verify the model number of the Galaxy Note 8.0 by navigating to Settings >> About Phone.
Steps to Root Galaxy Note 8.0 (Wi-Fi) N5110 Running on Android 4.4.2 KitKat Firmware Step 1: Extract CF-Auto-Root and Odin 3.09 files using WinRAR/7-Zip/WinZip or any other extracting tool. Step 2: Switch off the Galaxy Note 8.0. Then boot the device into Download Mode by pressing and holding Volume Down, Home and Power buttons together until a construction Android robot icon with a warning triangle appears on screen. Now press the Volume Up button to enter Download Mode. Step 3: Launch Odin on the computer as an Administrator. Step 4: Connect the Galaxy Note 8.0 to the computer using USB cable while it is in the Download Mode. Wait until Odin detects the device. When the device is connected successfully, the ID: COM box will turn blue with the COM port number. Additionally, the successful connected will be indicated by a message saying Added. Step 5: In Odin, click the AP button and select the CF-Auto-Root-konawifi-konawifixx-gtn5110.tar.md5 file. Step 6: Verify that Auto Reboot and F.Reset Time checkboxes are selected in Odin. Also, ensure the Re-Partition option is not selected. Step 7: Double-check and click Start button in Odin. The installation process will now begin. Step 8: Once the installation process is completed, your phone will restart and soon you will see a PASS message with green background in the left-most box at the very top of the Odin. You can now unplug the USB cable to disconnect your device from computer.
Samsung Galaxy Note 8.0 (Wi-Fi) N5110 running on Android 4.4.2 KitKat firmware is now rooted successfully. You can now install any app that requires root permission. Verify the root status of the device by downloading Root Checker app from Google Play Store.
Note:Many Samsung devices store a flash counter that keeps track of how many times you have flashed custom firmwares to your device. Triangle Away can be used to reset the flash counter to zero.
Thank's to all fellas at XDA who first tried out this rooting technique. This method was originally posted via XDA-Developers original thread.
The Wi-Fi version of Samsung Galaxy Note 8.0 with model number GT-N5110 has already receiving a new Android 4.4.2 KitKat update with firmware build number N5110XXDNE1. The new official update is now available as an Over-The-Air (OTA) update as well as through Samsung KIES. Firmware details PDA: N5110XXDNE1 CSC: N5110OXADNE1 MODEM: N5110XXDNE1 Version: Android 4.4.2 Build date: May 01, 2014 Regions: United Kingdom
Samsung Galaxy Note 8.0 (Wi-Fi) N5110 users who missed the OTA update notification or unable to access the update over Samsung KIES, and those who are residing outside UK can now download and install the same manually, using our step-by-step guide below. Pre-requisites 1. Install USB Drivers for Samsung Galaxy Note 8.0 on the computer. 2. Enable USB Debugging Mode on the phone by navigating to Settings >> Developer Options. 3. Make a backup of all your important data before following the guide. 4. Ensure the battery of the phone is charged more than 80 percent. 5. The Android 4.4.2 XXDNE1 KitKat firmware is compatible only with the Wi-Fi version of Galaxy Note 8.0 (GT-N5110). Applying this to any incorrect variant might brick the device. Verify the model number of the Galaxy Note 8.0 by navigating to Settings >> About Phone.
Files Required 1. Android 4.4.2 XXDNE1 KitKat Firmware (Mirror Link) for Galaxy Note 8.0 (Wi-Fi) N5110 2. Odin 3.07 Steps to Update Galaxy Note 8.0 (Wi-Fi) N5110 with Android 4.4.2 XXDNE1 KitKat Firmware Step 1: Extract Firmware zip file using WinRAR/7-Zip/WinZip or any other extracting tool, you will get a .tar.md5 file and some other files (optional). Step 2: Extract Odin zip file and you will get Odin3 v3.07.exe along with few other files. Step 3: Switch off the Galaxy Note 8.0. Step 4: Boot the device into Download Mode by pressing and holding Volume Down, Home and Power buttons together until a construction Android robot icon with a warning triangle appears on screen. Now press the Volume Up button to enter Download Mode. Step 5: Run Odin on the computer as an Administrator. Step 6: Connect the Galaxy Note 8.0 to the computer using USB cable while it is in the Download Mode. Wait until Odin detects the device. When the device is connected successfully, the ID: COM box will turn to light blue with the COM port number. Additionally, the successful connected will be indicated by a message saying Added. Step 7: Select the following files in Odin from extracted N5110XXDNE1 firmware folder:
Click the PDA button and select the .tar.md5 file.
Click the Phone button and select file with MODEM in its name. Ignore if there is no such file.
Click the CSC button and select file with CSC in its name. Ignore if there is no such file.
Click the PIT button and select the .pit file. Ignore if there is no such file.
Step 8: In Odin, enable Auto Reboot and F. Reset Time checkboxes. Also, ensure the Re-Partition checkbox is chosen only if a .pit file was chosen in the previous step. Step 9: Verify everything suggested in Step 7 and Step 8 is done correctly. Then hit the Start button to begin the installation process. Step 10: Once the installation process is completes, your phone will restart and soon you will see a PASS message with green background in the left-most box at the very top of the Odin. You can now unplug the USB cable to disconnect your device from the computer.
Samsung Galaxy Note 8.0 (Wi-Fi) N5110 should be now updated with Android 4.4.2 XXDNE1 KitKat official firmware. Head over to Settings >> About Phone to verify the software version running on the device.
Note:If Galaxy Note 8.0 (Wi-Fi) N5110 stuck at booting animation after Step 10 then go to recovery mode (press and hold the Volume Up, Home and Power buttons together) and perform Wipe data/Factory Reset and Wipe Cache Partition task before selecting reboot system now function. In recovery mode use Volume keys to navigate between options and Power key to select the option. Please note, performing wiping task will erase your device internal memory data and not external SD card data.
The Wi-Fi version of Samsung Galaxy Tab 2 7.0 (GT-P3110) has just received a new Android 4.2.2 Jelly Bean update with firmware build number P3110XXDNE1.
Samsung Galaxy Tab 2 7.0 (Wi-Fi) P3110 users who have already updated their devices with Android 4.2.2 Jelly Bean, may root their devices using the tutorial below.
This tutorial uses CF-Auto-Root file released by Senior Recognized XDA-Developers, Chainfire. Head over to the CF-Auto-Root main thread to learn more about the root method. Disclaimer: Rooting voids the warranty of your device. We and the developer of this rooting procedures shall not be held responsible if any undesirable outcomes may happen to your device. use of this root guide is solely at your own risk!
Pre-requisites 1. Install USB Drivers for Samsung Galaxy Tab 2 7.0 on the computer. 2. Enable USB Debugging Mode on the tablet by navigating to Settings >> Developer Options. 3. Make a backup of all your important data before following the guide. 4. Ensure the battery of the tablet is charged more than 80 percent. 5. The CF-Auto-Root file works only on the Wi-Fi version of Samsung Galaxy Tab 2 7.0 (GT-P3110). Applying this to any incorrect variant might brick the device. Verify the model number of the Galaxy Tab 2 7.0 by navigating to Settings >> About Phone.
Steps to Root Galaxy Tab 2 7.0 (Wi-Fi) P3110 Running on Android 4.2.2 Jelly Bean Firmware Step 1: Extract CF-Auto-Root and Odin 3.07 files using WinRAR/7-Zip/WinZip or any other extracting tool. Step 2: Switch off the Galaxy Tab 2 7.0. Then boot the device into Download Mode by pressing and holding Volume Downand Power buttons together until a construction Android robot icon with a warning triangle appears on screen. Now press the Volume Up button to enter Download Mode. Step 3: Launch Odin on the computer as an Administrator. Step 4: Connect the Galaxy Tab 2 7.0 to the computer using USB cable while it is in the Download Mode. Wait until Odin detects the device. When the device is connected successfully, the ID: COM box will turn to light blue with the COM port number. Additionally, the successful connected will be indicated by a message saying Added. Step 5: In Odin, click the PDA button and select the CF-Auto-Root-espressowifi-espressowifixx-gtp3110.tar.md5 file. Step 6: Verify that Auto Reboot and F. Reset Time checkboxes are selected in Odin. Also, ensure the Re-Partition option is NOT selected. Step 7: Double-check and click Start in Odin. The installation process will now begin. Step 8: Once the installation process completes, your tablet will restart and soon you will see a PASS message with green background in the left-most box at the very top of the Odin. You can now unplug the USB cable to disconnect your device from the computer.
Samsung Galaxy Tab 2 7.0 (Wi-Fi) P3110 running on Android 4.2.2 Jelly Bean is now rooted successfully. You can now install any app that requires root permission. Verify the root status of the device by downloading Root Checker app from Google Play Store.
Note:Many Samsung devices store a flash counter that keeps track of how many times you have flashed custom firmwares to your device. Triangle Away can be used to reset the flash counter to zero.
Thank's to all fellas at XDA who first tried out this rooting technique. This method was originally posted via XDA-Developers original thread.
Samsung has rolled out a new Android 4.2.2 Jelly Bean update for the Wi-Fi version of Galaxy Tab 2 7.0 (GT-P3110). The new official firmware is now available as an Over-The-Air (OTA) update as well as through Samsung KIES. Firmware details PDA: P3110XXDNE1 CSC: P3110XEODNE1 MODEM: P3110XXDNE1 Version: Android 4.2.2 Build date: May 06, 2014 Regions: Poland
Samsung Galaxy Tab 2 7.0 (Wi-Fi) P3110 users who missed the OTA update notification or unable to access the update over Samsung KIES, can now download and install the same manually using our step-by-step guide. Pre-requisites 1. Install USB Drivers for Samsung Galaxy Tab 2 7.0 on the computer. 2. Enable USB Debugging Mode on your tablet by navigating to Settings >> Developer Options. 3. Make a backup of all your important data before following the guide. 4. Ensure the battery of the tablet is charged more than 80 percent. 5. The Android 4.2.2 XXDNE1 Jelly Bean firmware is compatible only with the Wi-Fi version of Samsung Galaxy Tab 2 7.0 (GT-P3110). Applying this to any incorrect variant might brick the device. Verify the model number of the Galaxy Tab 2 7.0 by navigating to Settings >> About Phone.
Files Required 1. Android 4.2.2 XXDNE1 Jelly Bean Firmware (Mirror Link) for Galaxy Tab 2 7.0 (Wi-Fi) P3110 2. Odin 3.07 Steps to Update Galaxy Tab 2 7.0 (Wi-Fi) P3110 with Android 4.2.2 XXDNE1 Jelly Bean Firmware Step 1: Extract Firmware zip file using WinRAR/7-Zip/WinZip or any other extracting tool, you will get a .tar.md5 file and some other files (optional). Step 2: Extract Odin zip file and you will get Odin3 v3.07.exe along with few other files. Step 3: Switch off the Galaxy Tab 2 7.0. Step 4: Boot the device into Download Mode by pressing and holding Volume Down and Power buttons together until a construction Android robot icon with a warning triangle appears on screen. Now press the Volume Up button to enter Download Mode. Step 5: Run Odin on the computer as an Administrator. Step 6: Connect the Galaxy Tab 2 7.0 to the computer using USB cable while it is in the Download Mode. Wait until Odin detects the device. When the device is connected successfully, the ID: COM box will turn to light blue with the COM port number. Additionally, the successful connected will be indicated by a message saying Added. Step 7: Select the following files in Odin from extracted P3110XXDNE1 firmware folder:
Click the PDA button and select the .tar.md5 file.
Click the Phone button and select file with MODEM in its name. Ignore if there is no such file.
Click the CSC button and select file with CSC in its name. Ignore if there is no such file.
Click the PIT button and select the .pit file. Ignore if there is no such file.
Step 8: In Odin, enable Auto Reboot and F. Reset Time checkboxes. Also, ensure the Re-Partition checkbox is chosen only if a .pit file was chosen in the previous step. Step 9: Verify everything suggested in Step 7 and Step 8 is done correctly. Then hit the Start button to begin the installation process. Step 10: Once the installation process completes, your device will restart and soon you will see a PASS message with green background in the left-most box at the very top of the Odin. You can now unplug the USB cable to disconnect your device from the computer.
Samsung Galaxy Tab 2 7.0 (Wi-Fi) P3110 should be now updated with the Android 4.2.2 XXDNE1 Jelly Bean official firmware. Head over to Settings >> About Phone to verify the software version running on the device.
Note:If Galaxy Tab 2 7.0 (Wi-Fi) P3110 stuck at booting animation after Step 10 then go to recovery mode (press and hold the Volume Up and Power buttons together) and perform Wipe data/Factory Reset and Wipe Cache Partition task before selecting reboot system now function. In recovery mode use Volume keys to navigate between options and Power key to select the option. Please note, performing wiping task will erase your device internal memory data and not external SD card data. Read also:How to Root Galaxy Tab 2 7.0 (Wi-Fi) P3110 on Android 4.2.2 Jelly Bean Firmware
Samsung has released another Android 4.3 Jelly Bean update for the Galaxy Grand 2 DUOS (SM-G7102). The new official firmware is now available as an Over-The-Air (OTA) update as well as through Samsung KIES.
Firmware details PDA: G7102XXUANE2 CSC: G7102ODDANE1 MODEM: G7102DDUANE2 Version: Android 4.3 Build date: May 13, 2014 Regions: India, Bangladesh, Nepal, Sri Lanka
Samsung Galaxy Grand 2 DUOS SM-G7102 users who missed the OTA update notification or unable to access the update over Samsung KIES, may follow our step-by-step guide to install the update manually. Pre-requisites 1. Install USB Drivers for Samsung Galaxy Grand 2 on the computer. 2. Enable USB Debugging Mode on the phone by navigating to Settings >> Developer Options. 3. Make a backup of all your important data before following the guide. 4. Ensure the battery of the phone is charged more than 80 percent. 5. The Android 4.3 XXUANE2 Jelly Bean firmware is compatible only with the Galaxy Grand 2 DUOS (SM-G7102). Applying this to any incorrect variant might brick the device. Verify the model number of the Galaxy Grand 2 by navigating to Settings >> About Phone.
Files Required 1. Android 4.3 XXUANE2 Jelly Bean Firmware (Mirror Link) 2. Odin 3.07 Steps to Update Galaxy Grand 2 DUOS SM-G7102 with Android 4.3 XXUANE2 Jelly Bean Firmware Step 1: Extract Firmware zip file using WinRAR/7-Zip/WinZip or any other extracting tool, you will get a .tar.md5 file and some other files (optional). Step 2: Extract Odin zip file and you will get Odin3 v3.07.exe along with few other files. Step 3: Switch off the Galaxy Grand 2. Step 4: Boot the device into Download Mode by pressing and holding Volume Down, Home and Power buttons together until a construction Android robot icon with a warning triangle appears on screen. Now press the Volume Up button to enter Download Mode. Step 5: Run Odin on the computer as an Administrator. Step 6: Connect the Galaxy Grand 2 to the computer using USB cable while it is in the Download Mode. Wait until Odin detects the device. When the device is connected successfully, the ID: COM box will turn to light blue with the COM port number. Additionally, the successful connected will be indicated by a message saying Added. Step 7: Select the following files in Odin from extracted G7102XXUANE2 firmware folder:
Click the PDA button and select the .tar.md5 file.
Click the Phone button and select file with MODEM in its name. Ignore if there is no such file.
Click the CSC button and select file with CSC in its name. Ignore if there is no such file.
Click the PIT button and select the .pit file. Ignore if there is no such file.
Step 8: In Odin, enable Auto Reboot and F. Reset Time checkboxes. Also, ensure the Re-Partition checkbox is chosen only if a .pit file was chosen in the previous step. Step 9: Verify everything suggested in Step 7 and Step 8 is done correctly. Then hit the Start button to begin the installation process. Step 10: Once the installation process completes, your phone will restart and soon you will see a PASS message with green background in the left-most box at the very top of the Odin. You can now unplug the USB cable to disconnect your device from the computer.
Samsung Galaxy Grand 2 DUOS SM-G7102 should be now updated with Android 4.3 XXUANE2 Jelly Bean official firmware. Head over to Settings >> About Phone to verify the software version running on the device.
Note:If Galaxy Grand 2 DUOS SM-G7102 stuck at booting animation after Step 10 then go to recovery mode (press and hold the Volume Up, Home and Power buttons together) and perform Wipe data/Factory Reset and Wipe Cache Partition task before selecting reboot system now function. In recovery mode use Volume keys to navigate between options and Power key to select the option. Please note, performing wiping task will erase your device internal memory data and not external SD card data.
The Sprint version of Samsung Galaxy S3 with model number SPH-L710 has already receiving Android 4.4.2 KitKat update with firmware build number L710VPUDND8.
Samsung Galaxy S3 (Sprint) SPH-L710 users who have already installed their devices with Android 4.4.2 KitKat, may root their devices using the tutorial below.
This tutorial uses CF-Auto-Root file released by Senior Recognized XDA-Developers, Chainfire. Head over to the CF-Auto-Root main thread to learn more about the root method. Disclaimer: Rooting voids the warranty of your device. We and the developer of this rooting procedures shall not be held responsible if any undesirable outcomes may happen to your device. use of this root guide is solely at your own risk!
Pre-requisites 1. Install USB Driver for Samsung Galaxy S3 on the computer. 2. Enable USB Debugging Mode on the phone by navigating to Settings >> Developer Options. 3. Make a backup of all your important data before following the guide. 4. Ensure the battery of the phone is charged more than 80 percent. 5. The CF-Auto-Root file works only on the Sprint version of the Galaxy S3 (SPH-L710). Applying this to any incorrect variant might brick the device. Verify the model number of the Galaxy S3 by navigating to Settings >> About Phone.
Steps to Root Galaxy S3 (Sprint) SPH-L710 Running on Android 4.4.2 KitKat Firmware Step 1: Extract CF-Auto-Root and Odin 3.09 files using WinRAR/7-Zip/WinZip or any other extracting tool. Step 2: Switch off the Galaxy S3. Then boot the device into Download Mode by pressing and holding Volume Down, Homeand Power buttons together until a construction Android robot icon with a warning triangle appears on screen. Now press the Volume Up button to enter Download Mode. Step 3: Launch Odin on the computer as an Administrator. Step 4: Connect the Galaxy S3 to the computer using USB cable while it is in the Download Mode. Wait until Odin detects the device. When the device is connected successfully, the ID: COM box will turn to light blue with the COM port number. Additionally, the successful connected will be indicated by a message saying Added. Step 5: In Odin, click the AP button and select the CF-Auto-Root-d2spr-d2spr-sphl710.tar.md5 file. Step 6: Verify that Auto Reboot and F. Reset Time checkboxes are selected in Odin. Also, ensure the Re-Partition option is NOT selected. Step 7: Double-check and click Start button in Odin. The installation process will now begin. Step 8: Once the installation process is completed, your phone will restart and soon you will see a PASS message with green background in the left-most box at the very top of the Odin. You can now unplug the USB cable to disconnect your device from the computer.
Samsung Galaxy S3 (Sprint) SPH-L710 running on Android 4.4.2 KitKat is now rooted successfully. Open the app drawer of the phone and check for an app called SuperSU. Verify the root status of the device by downloading Root Checker app from Google Play Store.
Note:Many Samsung devices store a flash counter that keeps track of how many times you have flashed custom firmwares to your device. Triangle Away can be used to reset the flash counter to zero.
How to Fix "Unfortunately, SuperSU has stopped"? Step 1: Download and install the latest APK of SuperSU on your device. Step 2: Open SuperSU app (update the binary if prompted) and allow it to disable KNOX. Step 3: Reboot your device.
Thank's to all fellas at XDA who first tried out this rooting technique. This method was originally posted via XDA-Developers original thread.


